

Chapter Five:
The Odoshi
Parts of the Lacing
Each section of lacing has its own name, and it would be good to keep them straight. The lacing itself is called odoshi, and the material is odoshige (lit. “lacing-hair”). The initial lacing of the individual scales to form solid boards is called shitagarami, or bottom-stitching. This is not truly considered part of the odoshi, which is a term that concerns the suspensory and decorative lacing only.

Digression à propos of nothing: The origin of the term odoshi is said to lie with the verb odosu, to intimidate. Thus the bright colors. In reverse engineering, a different character is used to write odoshi(intimidation) and odoshi (lacing), and using the latter character we have a homophonous verb odosu, “to make armour” (or, more correctly, lace one together). Armourers today generally just use the verb tsukuru (“to make”—as in “yoroi wo tsukuru”) in reference to the process of armouring.
The braid that runs from one lame to the next, called “suspensory braid” in English, is kedate. The lacing that connects the kusazuri to the dō is the yurugi ito.

In full-laced armours of the most ancient lineage (we have only one extant ō-yoroi and a model of one), the lacing holding the lames was straight up-and-down rather than diagonally offset. The straight up-and-down model is called tate garami (standing-stitching) and the diagonal model nawame garami (lit. “wave-eye-stitching”). The top band of lacing, where the lacing supports the plate or board, is thus either nawame or tate garami. Note that no Sengoku armours display tate garami.
The right- and left-most row of lacing is called mimi ito (lit. “ear-cord”). On virtually all but the cheapest armours, it is always a different color than the primary lacing, and usually patterned with some variation on herringbone called chidori odoshi. Chidori means “plover.” The lacing is so named as it is said to resemble that bird's plumage. Unlike the rest of the braid, which goes only between two boards, the mimi ito runs the full length of the armour section, be it two lames or five. Since it runs straight, the top of mimi ito is always tate garami.
The bottom-most plate, called the hishinui-no-ita, is decorated with broad, bright-colored crosslaces (hishinui). These occupy the bottom pairs of four holes where the shita garami usually goes. Hishinui were leather in the older ō-yoroi, but by the 1500s were usually red braid, regardless of the color of the lacing of the rest of the armour. Occasionally, when the armour was laced in red, the hishinui were yellow or orange, just to provide a contrast.
To fill the set of holes usually occupied by the emerging kedate, the hishinui-no-ita has instead a running stitch of straight lace. This is sometimes called uname garami. In some armours, notably the earlier ones like ō-yoroi and older dō maru, the uname garami is the same lacing material as the hishinui. In tōsei gusoku, the uname is almost always the same lacing as the mimi ito. The braid is tied off behind and emerges from the kedate hole at the top-most plate, runs all the way down the series of lames, across the hishinui-no-ita, then back up the other side, disappearing into the top plate's kedate hole where it is tied off.
Mimi ito can be a contrasting color if you can't find chidori odoshi. White or light tan is an acceptable alternative, although I've seen more than one suit using yellow where the base lacing is dark blue or purple. Even in armours laced in leather, braid mimi ito was the rule. In exceptions, a contrasting color of leather—often a simple, undyed tan leather—was used.
Materials
The materials for lacing are leather or silk braid (or cotton twill in the cheaper armours). The leather was primarily deer hide, which can be acquired at most leather stores. Silk braid is prohibitively expensive, as it has to be made to special order in color and width. (This brings up another important issue which will be dealt with below: size.) When I studied in Japan, my teacher wouldn't let me use anything but silk, and that was painful on the wallet.
A logical alternative to silk braid is flat nylon braid or cord. This can be had in many colors and has the advantages of being sturdy (so it can hold up to our methods of combat), and it melts under a low flame (so it's easy to work with and knots never come undone). Parachute cord is a decent source, but you have to remove the core to make it flat. The only problem is that parachute cord, when flat, is only 1/4" wide at best—narrow by Japanese standards. This would necessitate very narrow scales if you're making something with kebiki lacing, or more lacing pairs if you're doing sugake.

One source is a product of Hancock's Fabrics. It is this company’s specific product. They have a store brand of polypropylene lace called Sew Perfect (product number 1823). It comes in two widths: 3/8" and 7/8". Either of these widths would make excellent lacing. The only hitch is that it comes only in black, red, white, and dark blue. Given that these are the most common colors of lacing, it should pose no problem, but if you want to lace something a bit more outré, you're out of luck. The photograph at the left shows the Sew Perfect braid (in red) next to a piece of real silk odoshige (in orange).
Yet another excellent source—and perhaps the best of all—is Rice Braid. Their lace is available in a very wide variety of colors and widths. Some of the wider varieties would be excellent for early-period ō-yoroi, and it comes in a variety of colors that would allow the all but the most adventurous lacing maven free reign. The recommended product is the “plain flat braid” in either nylon or textured polyester. For the Noble Plastics kozane, either 3/8" or 1/2" is good (the latter would provide a particularly luxuriant look).
You can also find odoshi from various sources in Japan. This is the real thing, and costs about $3.50 per meter, if not more. Not bad if you’re making a dress suit in sugake odoshi, but if you intend to fight in it, and you are thinking kebiki odoshi, you need to win the lottery first.
If you plan on using leather, I recommend buying it in the color you intend to use, if possible. If you are considering a patterned leather—such as kozakura gawa odoshi or shina gawa odoshi—you will have to print the leather yourself.
For cloth braid, lacing should be not much longer than one-yard segments. By the time it’s gone in and out of all those holes several times, it’ll be frayed enough. For leather, lengths of five or six inches is the rule (enough, only, for one or two sets of in-and-out lacing). If you are making armour for combat, you may do what you wish, but it's far easier to replace sections of lacing than a whole piece.
If you're using nylon or poly cords, you have the great advantage of working with something that melts; all you have to do is splay the braid out at the back of the lame, press a heated knife blade to it, and you've got a solid blob of braid that won't pull through the hole. Period armourers (and those working with silk or cloth) must first cut and fray the section, then apply liberal amounts of paste to it, then tuck the edges in on themselves to make that blob. They're only a little different looking than the melted blob, but harder to do and less secure in the long-run.
Types of Lacing
Kebiki Odoshi
Kebiki odoshi (also referred to as “full lacing”) is of course the oldest form of Japanese lacing. In this lacing, the braid is luxuriant and thick on the armour, showing no gaps. Kebiki odoshi holds one board to the next, as the lacing goes back and forth between two boards, unlike sugake odoshi.


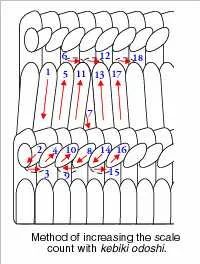
Kebiki lacing is the trickiest, as it's the one that requires more techniques. How do you increase the braid when you add a scale (or just increase width) to the next lame down? How do you reduce the lacing for the opposite effect? Since it's easier to show than explain, note the illustrations above. Compare them to the method of lacing straight kebiki. It really is quite easy.
Kebiki must be laced from the left to the right as you hold the plate in front of you, front side toward you. The diagonals—the nawame garami—runs “southwest” to “northeast.” (Note: If you have a copy of Manufacture of Armour and Helmets in Sixteenth Century Japan by Sakakibara Kōzan, ignore all lacing instructions therein. The artist got the lacing pattern exactly backwards! A glance at any suit of armour will show you that the lacing goes the other way.)
Sugake Odoshi
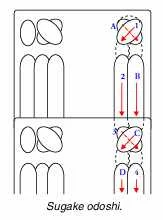
Sugake odoshi (also called “sparce-point lacing”) appeared in the fifteenth century as an economical measure: it saves both time and expense. This is characterized by pairs of braids topped by an X. Unlike kebiki odoshi, sugakeruns straight down the entire length of the piece, be it two lames or seven. Kebiki, of course, runs only between individual pairs of lames.

Sugake odoshi is very simple and is the hurried armourer's best friend. Fewer holes, fewer sets of lace, fewer things to go wrong. The problem is, if you're using sugake, you really need a broader braid, or at least a fairly large number of lacing pairs. No thin, sparsely spaced threads. It is often—very often—poorly done (and even by some companies in Japan who make “replica armour”—shame on them!). There should be, as I've said, no space between the braids. The cross-laces above the sugake should not look like Xs so much as squares. Note the illustration at the right, and the photographs below, to see what constitutes appropriately spaced pairs of lacing.
Real sugake has the lacing behind the lame (between the hishinui and the kedate) just run straight across, but for SCA combat, I'd recommend you tie off knots (and give it a melting treatment for good measure) to prevent any possible slipping tendency the lames may develop.

Miscellaneous
Three-braid lacing (essentially sugake with a third braid between the other two having a vertical strip overlaying the X making it look like an asterisk), called variously chikara odoshi or midokoro gake odoshi, can occasionally be seen in armour books, but it can't be documented before the mid-1600s. The same holds true of armours with “sections” of lace—four or five pairs of sugake—separated by areas of no lace. Such oddities are probably the result of Edo-period armourers looking for new, more exotic methods to dress up armours.
Hishinui no ita
The hishinui no ita is the bottom-most plate of any piece of armour with lacing on it. It is so called because it is the plate (ita) with crosslaces (hishinui) running along the bottom. Obviously, in the case of armours made of scale, it is a structural element, replacing as it does the shitagarami on all the other boards made of scale which are hidden by the suspensory lacing and the overlapping boards.
In the case of plate armours, however, it is not needed. In fact, one might consider that to open the great number of holes necessary for making a hishinui no ita, the plate would become too weak to withstand the constant stresses of percussive combat. This is very true, and something that you would need to consider before undertaking making your armour ostentatious in this way.
Given the smaller lames used often in kusazuri and sode—and especially so with the shikoro—an abbreviation of the hishinui no ita is often met with. That is, a conventional hishinui no ita has the nawame odoshi from the suspensory braid; below this runs the horizontal uname odoshi (the running braid); below that are two rows of crosslaces. During the Sengoku period, we often find armours made with the uname odoshi and only a single row of crosslaces, or instead two rows of crosslaces but no uname odoshi. In fact, we often find that the bottom-most plate has nothing but the nawame odoshi, even when the piece is laced in kebiki odoshi. Look at the pieces in the chapter “The Sode” and you’ll see various different ways to deal with that.
Another thing that must be kept in mind is the actual arrangement of the crosslaces. If there are two rows, they must be offset—and this will result in either a single pair of “empty” holes at the end in each row (if there is an odd number of pairs of holes), or two pairs of empty holes at either end of one row (if there is an even number). These holes are filled with a simple vertical band of lacing instead of crosslacing, which would require two pairs of holes. For these vertical strips, you have a choice of which way to lace them, depending on the hole number. See the graphic below four your four possible choices. Remember to be consistent all through the lacing—it wouldn’t do to have kusazuri laced half in the first pattern and half in the second.

Lacing Size
Not all lacing is the same width. The lacing used in kusazuri and shikoro, for example, is usually narrower than that used in the dō. When ordering braid from the braid-maker, an armourer will specify a number of threads; this is the thread count to be used in the construction of the lacing. The braid-maker dyes all the threads at once, then he counts out a specified number of threads and begins braiding the cord. He also uses these same threads to make all the various cords and ties that are used in the armour. This is how he guarantees that all the lacing (whether broad or narrow) and the ties (whether round or flat) will match.
Because of the need for lacing or varying widths in a single suit of armour, you need to design any armour you are making of kozane to fit the lacing you can find. If you are lucky enough to use a source with multiple widths of the exact same color and material (e.g., Rice Braid, above), congratulations. If you are making an armour with leather lacing, you can cut the leather to any width you want so you can use broader scales, and the problem of store-bought braid become a non-issue.

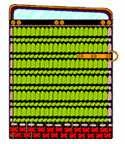
Proper kebiki odoshi should be laced so that one row overlaps slightly the row next to it, on the left. There should be no gaps. Sugake odoshi should be directly side by side; again, no gaps. Any armours you see in museums or books exhibiting a gap is suffering from age and gravity. The photo at left, a detail of a kozakura gawa (cherry blossom printed leather) odoshi armour, shows clearly how the overlap makes the lacing look rich and luxuriant.
What does this mean?
It means that if you are working with 1/4"-wide lacing (assuming a lacing material like gutted parachute cord), your scales can't be wider than half an inch. No kidding. And half an inch is pushing it. If you make the scales any broader, the lacing will not fit properly and there will be gaps between rows and the armour will look awful. That's why I try to order braid special to fit the armours I plan to make.
The lacing from the kozakura gawa odoshi ō-yoroi in Itsukushima Jinja is a full 1" wide. The red silk braid from the aka ito odoshi ō-yoroi in the same location is a shade over 3/4" in width. These are old armours, though. The kozane of the kozakura gawa are almost 2" in width, and those of the aka ito are about 1 5/8" wide. When we get down to armours with 1/4" braid, we're looking at an iro-iro odoshi haramaki in Sada Jinja, which has kozane of less than 1/2" in width. Yes, you read that right.
These are just things to keep in mind.
Colors
You have a broad palette to choose from, although during the latter part of the sixteenth century, in the Sengoku Jidai (or Age of Battles), the predominant color seems to have been dark blue. This lacing color is called kon-ito odoshi, and as the name implies, is a color for silk braid, not leather. (There have been quite a few kon-gawa odoshi armours, however, but kon is still generally considered a braid color.)
The next most popular braid colors after kon seem to have been aka (red) and hi (usually translated as “scarlet” but in fact deep orange). These were followed closely by moegi (green), yomogi (a pale, almost sickly green), murasaki (purple), shiro(white), and kuro (black). After that, the other colors are pretty much in the dust. A note must be made about murasaki; while it is purple, many times a more brown/burgundy color is also called murasaki.
Since it's traditional to display colors and patterns of lacing on a sode—specifically an ō-sode—I've done the same here.

Aka ito (red braid)

Hanada ito (pale blue braid)

Hi ito (orange braid)

Kon ito (dark blue braid)

Kuro ito (Black braid)

Moegi ito (green braid)

Murasaki ito (purple braid)

Shiro ito (white braid)
Yomogi ito (pale green braid)
This link will bring you to a graphics-intensive page showing various lacing pattern samples.
Other Cords and Laces
There are two types of cords and laces. One matches the base color of the odoshi; the other matches the mimi ito. An armour may incorporate one, the other, or both. Ties are usually round, rather than flat like the armour lacing braid.
Ties that are required are: (1) the connecting pieces from munaita to the watagami, (2) the connecting pieces from the watagami to the sode, (3) cinch cord to tie the dō closed, (4) support ties for the sode (if any), and (5) loop for the cinch cord. Other cords that you may incorporate are ornamental cords along the top of the watagami.
Kote ties and braid should match the fabric of the kote, or the base color of the odoshi. The shinobi-no-o (helmet cord) may also match but need not be a really thick round version of the base lacing. Cords for the menpō and nodowa, of course, should match.